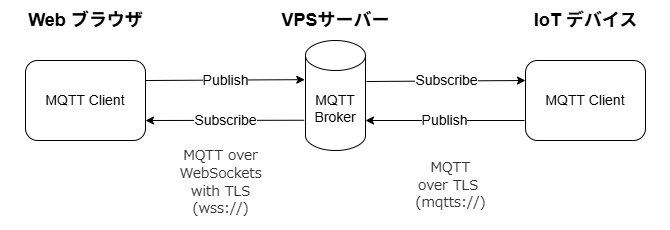
Web ブラウザから IoT デバイスの監視と制御
MQTT Mosquitto ブラウザ Web ソケット WebSocket IoTデバイス 監視・制御 SSL/TLS
背景
MQTT プロトコルは IoT 機器の監視・制御に最適な通信方式です。 Mosquitto や EMQX社 から無料で利用できる MQTT Broker が提供されていて手軽に利用できます。 しかし予期せぬサーバーの停止により IoT 機器の監視・制御に不都合をきたしたり、相乗りサーバーのためどうしてもセキュリティに対する不安も残ります。
これらの課題を解決するために VPS サーバーにセキュリティ対策も行った MQTT Broker をインストールして IoT システムを構成しました。 特に Web ブラウザと MQTT Broker 間の MQTT over WebSockets with TLS に多くの試行錯誤をともなったので整理して記録を残します。
ゴール
・VPS サーバーに MQTT Broker インストール
・TLS(SSL) によるセキュリティ対応
・IoT デバイス (C++) と MQTT Broker 間は MQTT over TLS (mqtts://) 通信
・Web ブラウザ (HTML, Java Script, CSS) と MQTT Broker 間 MQTT over WebSockets with TLS (wss://) 通信
本章では MQTT Broker mosquitto のインストールまでを記録します。
前提条件
・VPSサーバー Linux OS Debian (バージョン 6.1.153-1)
・IoT デバイス ESP32-DevKitC
・開発プラットフォーム Visual Studio Code (バージョン:1.105.0)
・拡張機能 PlatformIO IDE for VSCode (バージョン 3.3.4)
・開発言語 Linux , C++, HTML, Java Script, CSS
・通信プロトコル MQTT over TLS (mqtts://), MQTT over WebSockets with TLS (wss://)
事前準備
事前に必要なポートを開放しておきます。
・443 Web Server with TLS
・8883 MQTT over TLS
・8884 MQTT over WebSockets with TLS
( Mosquitto のデフォルトポートとは異なりますが、ここでは 8883, 8884 を使用します。)
Mosquitto インストール
(参考)【Mosquitto】MQTTブローカの構築・動作確認 (ユーザ認証・TLS暗号化まで)
インストールされているパッケージのアップデートとアップグレードを実行します。
$ sudo apt upgrade -y
mosquitto と mosquitto-clients をインストールします。
mosquitto を起動して状態を確認します。
$ sudo systemctl status mosquitto
次のように active(running) が表示されていれば正常に動作しています。
Loaded: loaded (/lib/systemd/system/mosquitto.service; enabled; preset: enabled)
Active: active (running) since Tue 2025-09-30 16:50:08 JST; 27s ago
Docs: man:mosquitto.conf(5)
man:mosquitto(8)
Process: 31582 ExecStartPre=/bin/mkdir -m 740 -p /var/log/mosquitto (code=exited, status=0/SUCCESS)
Process: 31583 ExecStartPre=/bin/chown mosquitto /var/log/mosquitto (code=exited, status=0/SUCCESS)
Process: 31584 ExecStartPre=/bin/mkdir -m 740 -p /run/mosquitto (code=exited, status=0/SUCCESS)
Process: 31585 ExecStartPre=/bin/chown mosquitto /run/mosquitto (code=exited, status=0/SUCCESS)
Main PID: 31586 (mosquitto)
Tasks: 1 (limit: 1105)
Memory: 1.4M
CPU: 15ms
CGroup: /system.slice/mosquitto.service
mq31586 /usr/sbin/mosquitto -c /etc/mosquitto/mosquitto.conf
Sep 30 16:50:08 ik1-343-31522 systemd[1]: Starting mosquitto.service – Mosquitto MQTT Broker…
Sep 30 16:50:08 ik1-343-31522 systemd[1]: Started mosquitto.service – Mosquitto MQTT Broker.
サーバーの再起動時に mosquitto を自動的に起動する設定にします。
enable コマンドを入力すると次の応答が表示されます。
Executing: /lib/systemd/systemd-sysv-install enable mosquitto
ユーザー認証を設定する
新規にパスワードを設定する場合は次のコマンドを実行します。
username は任意のユーザ名に変更します。
パスワード入力とパスワードの再入力を要求されるので入力します。
別のユーザーを入力する場合は -c オプションを省略します。
次のコマンドでハッシュ関数により生成されたファイルの内容を確認します。
ファイルの内容は次のようになります。
$7$101$9Q431FaAwu2+qLZQ$N663LIOWArnjj+urJxAUW1tOmL/OILPw7XarwSHMmQHov+M/4hlslWx3migoOXfsCI3PZuLgnx9jkHa9Y+JhGg==
username の部分には先ほど入力した任意のユーザー名が表示されます。
Apache のインストールと SSL/TLS 証明書の取得
(参考)Debian に Apache をインストールして Let’s Encrypt で HTTPS 対応するまで
Web サーバー Apache のインストールとSSL/TLS 証明書を取得します。Apache が動作すると SSL/TLS 証明書が正しくインストールされているかを容易に確認することができます。すでにインストールされている場合はこれらの手順はスキップします。
インストールされているパッケージのアップデートを確認してアップグレードを実行します。
$ sudo apt upgrade -y
Web サーバー Apache をインストールします。
certbot というツールを使うことで、無料で利用できる Let’s Encrypt 認証局から SSL/TLS 証明書を取得することができます。
certbot の登録を行います。
email address を求められるので入力します。
Terms of Service に同意を求められるので yes を入力します。
email adress のシェアについて聞かれるので yes または no を入力します。
Account registered. が表示されれば登録完了です。
証明書を取得します。
domain name(s) を求められるので入力します。
Certificate と Key の保存場所が表示されます。
domein-nameの部分は先ほど入力したものになります。
certificate の有効期限が表示されていますが、自動更新タスクが設定されているので安心です。
Certificate is saved at: /etc/letsencrypt/live/domein-name/fullchain.pem
Key is saved at: /etc/letsencrypt/live/domein-name/privkey.pem
This certificate expires on 2025-12-28.
These files will be updated when the certificate renews.
Certbot has set up a scheduled task to automatically renew this certificate in the background.
Apache を再起動します。
TCP ソケットの LISTEN、ポート番号、プロセスを確認します。
Apache2 が HTTP ポート 80 と HTTPS ポート 443 を LISTEN していることが分かります。
LISTEN 0 511 0.0.0.0:443 0.0.0.0:* users:((“apache2”,pid=5066,fd=4),(“apache2”,pid=5065,fd=4),(“apache2”,pid=5064,fd=4))
ブラウザに https://ドメイン名/index.html を入力します。
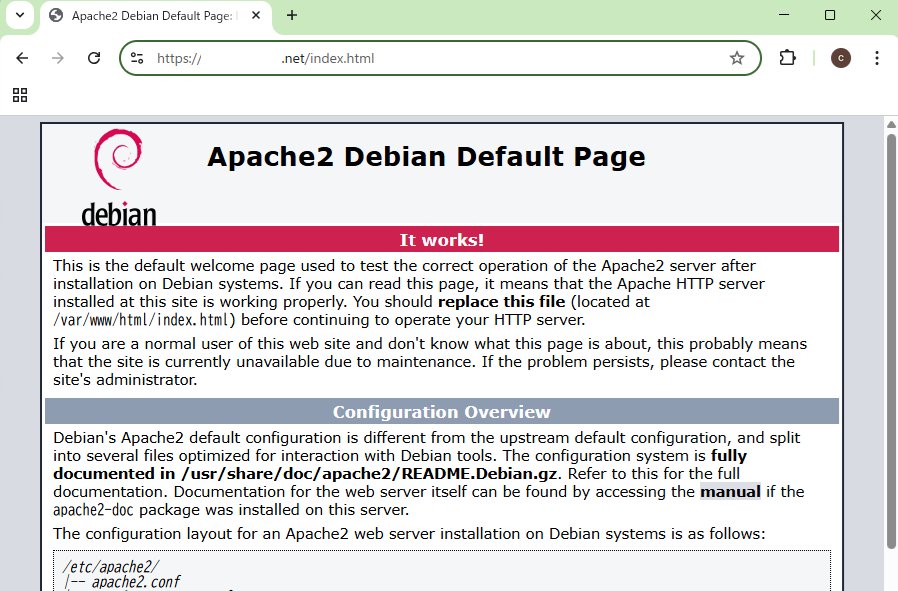
HTTPS 通信が正しく実行されて Apache デフォルトのページが表示されました。
Mosquitto 設定ファイルの編集
Mosquitto 設定を mqtts:// および wss:// に対応するように次のファイルを編集します。
/etc/mosquitto/mosquitto.conf
パスワード認証を必須として設定します。
password_file /etc/mosquitto/pwfile
MQTT over TLS ( mqtts:// ) 設定を行います。
ポート 8883 を使用します。
TLS v1.2 のみに限定してセキュリティを高めます。
Using Let’s Encrypt certificates with mosquitto に従って cafile、 certfile、 keyfile のディレクトリとファイル名を指定します。
certfile /etc/letsencrypt/live/hostname/fullchain.pem
keyfile /etc/letsencrypt/live/hostname/privkey.pem
cafile と certfile、keyfile はディレクトリが異なりますので注意が必要です。
MQTT over WebSockets with TLS ( wss:// ) 設定を行います。
ポート 8884 を使用します。
WebSockets プロトコルを指定します。
TLS v1.2 のみに限定してセキュリティを高めます。
Using Let’s Encrypt certificates with mosquitto に従って cafile、 certfile、 keyfile のディレクトリとファイル名を指定します。
certfile /etc/letsencrypt/live/hostname/fullchain.pem
keyfile /etc/letsencrypt/live/hostname/privkey.pem
cafile と certfile、keyfile はディレクトリが異なりますので注意が必要です。
mosquitto.conf の内容をまとめて再掲します。(コメント行は非表示)
persistence true
persistence_location /var/lib/mosquitto/
log_dest file /var/log/mosquitto/mosquitto.log
include_dir /etc/mosquitto/conf.d
allow_anonymous false
password_file /etc/mosquitto/pwfile
listener 8883
tls_version tlsv1.2
cafile /etc/ssl/certs/ISRG_Root_X1.pem
certfile /etc/letsencrypt/live/hostname/fullchain.pem
keyfile /etc/letsencrypt/live/hostname/privkey.pem
listener 8884
protocol websockets
tls_version tlsv1.2
cafile /etc/ssl/certs/ISRG_Root_X1.pem
certfile /etc/letsencrypt/live/hostname/fullchain.pem
keyfile /etc/letsencrypt/live/hostname/privkey.pem
証明書ファイルのパーミッション変更
証明書ファイルフォルダのパーミッションがデフォルト 700 に設定されている場合は 755 に変更します。
変更後のパーミッションを確認した結果です。
drwxr-xr-x 3 root root 4096 Sep 29 20:52 live
秘密鍵のパーミッションがデフォルト 600 に設定されている場合は 644 に変更します。
変更後のパーミッションを確認した結果です。
ブラウザから接続するための MQTT over WebSockets with TLS ( wss:// ) については MQTT クライアントツールとの接続はできるのですが、html、Java Scrit、css でコードを書いて Web ブラウザから mosquitto に接続しようとしても、どうしてもできず試行錯誤を繰り返しました。
他にも試行錯誤でパーミッションを変更した部分があるのですが、どの程度までが必須かは別途クリーンインストールの機会があれば検証したいと思います。
パーミッションの変更が完了したら mosquitto を再起動します。
コマンドラインによる動作確認
mosquitto_client をインストールすると mosquitto_pub, mosquitto_sub コマンドラインを使って MQTT 双方向通信を確認することができます。 ただしこれらのコマンドは MQTT over WebSockets with TLS ( wss:// ) には対応してなさそうなので、MQTT over TLS (mqtts:// ) プロトコルでのみ確認を行います。
mosquitto_sub コマンドで Subscribe (受信)を起動します。
-h hostname
-p port
–cafile PEM encoded CA certificates
-u username ( mosquitto_passwd 作成時のユーザー名を入力 )
–pw password (mosquitto_passwd 作成時のパスワードを入力 )
-t MQTT topic (MQTT メッセージを分類するために任意の文字列を入力 )
-d デバグメッセージが表示させるために -d オプションを付加
& バックグラウンドで実行させるためにコマンドの末尾に & を付加
[1] 239795
Client (null) sending CONNECT
Client (null) received CONNACK (0)
Client (null) sending SUBSCRIBE (Mid: 1, Topic: MQTT topic, QoS: 0, Options: 0x00)
Client (null) received SUBACK
Subscribed (mid: 1): 0
jobs コマンドでバックグラウンドの実行状況を確認します。
[1]+ Running mosquitto_sub -h “hostname” -p 8883 –cafile /etc/ssl/certs/ISRG_Root_X1.pem -u “user-name” –pw “19551121” -t “MQTT topic” -d &
mosquitto_pub コマンドでメッセージの Publish (送信)を行います。
-m message (例 {“title”:”test12345″} を JSON フォーマットで送信 )
Client (null) sending CONNECT
Client (null) received CONNACK (0)
Client (null) sending PUBLISH (d0, q0, r0, m1, ‘MQTT topic’, … (20 bytes))
Client (null) sending DISCONNECT
Client (null) received PUBLISH (d0, q0, r0, m0, ‘MQTT topic’, … (20 bytes))
{“title”:”test12345″}
Client (null) sending PINGREQ
Client (null) received PINGRESP
まとめ
mosquitto をインストールして MQTT Broker として稼働することができました。
以下の 2 点に注意する必要がありました。
・cafile に /etc/ssl/certs/ISRG_Root_X1.pem を使用する
・証明書ファイルに関連してパーミッション変更が必要
MQTT 用語集
MQTT(Message Queuing Telemetry Transport)
IoTデバイス向けの軽量なパブリッシュ/サブスクライブ型通信プロトコルです。
- 基本的な登場人物
Broker(ブローカー)
メッセージの仲介役となるサーバー。送信者から届いたメッセージを、適切な受信者へ振り分けます。
Client(クライアント)
ブローカーに接続するデバイスやアプリ。送信側(Publisher)と受信側(Subscriber)の両方になり得ます。
Publisher(パブリッシャー)
メッセージを送信する側のクライアント。
Subscriber(サブスクライバー)
メッセージを受信するために、特定のトピックを購読(登録)する側のクライアント。 - メッセージ通信の概念
Topic(トピック)
メッセージを分類するためのパス(例:home/living/sensor)。受信側はこのトピックを指定して購読します。
Payload(ペイロード)
メッセージの実データ部分。中身はテキストやバイナリなど任意です。
Publish(パブリッシュ)
クライアントが特定のトピックに対してメッセージを送信すること。
Subscribe(サブスクライブ)
クライアントが特定のトピックを受け取れるようにブローカーに登録すること。 - 品質と信頼性の設定
QoS(Quality of Service)
メッセージの到達保証レベルです。
QoS 0 (At most once)
最高1回。届かなくても再送せず、最も軽量。
QoS 1 (At least once)
最低1回。必ず届くが、重複する可能性がある。
QoS 2 (Exactly once)
正確に1回。重複なく確実に届ける、最も信頼性が高い。
Keep Alive(キープアライブ)
クライアントとブローカーの接続が維持されているか確認するための定期的な信号。
LWT(Last Will and Testament / 遺言)
クライアントが予期せず切断された際、ブローカーが代わりに他者へ通知するメッセージ。
Google 検索結果を引用させていただきました。
リンク
Mosquitto で MQTT 双方向通信
(1)Mosquitto を VPS にインストール
(2)Web ブラウザと IoT 間 動作エミュレート
(3)Web ブラウザ ソフトウエアコード
(4)IoT デバイスハードウエア
(5)IoT デバイス ソフトウエアコード
(6)システム全体動作確認
(YI)
コメント